角色可以是對手(或敵對),也可以是夥伴,端視遊戲規劃而定。其實,上一章中我們所加入的灰色球拍已經可以算是簡單的人工智慧了。怎麼說呢?player1control()函數中,當球的y座標遞減到400以下的時候,我們設定的灰色球拍便開始隨球的x座標移動,球往左,灰色球拍也往左,同樣的,球向右,灰色球拍也朝右邊移動。
乍看之下灰色球拍彷彿具有一定的智能,可以看得到球的位置,然後隨著球移動的方向嘗試去接球。不論灰色球拍是不是真的很聰明,仍是表現出具有智能的行為,我們若沒有對「智慧」有嚴格的定義與申論,我們說灰色球拍已經具備人工的「智慧」。
程式設計中所謂的人工智慧原文為artificial intelligence,實際的詞意比較接近中文的「人造的智能」,這裡,我們沿用的是常用的「人工智慧」一詞。以日常的用語而言,不論是智慧還是智能,某種程度上來說,好像都是只有我們人類所獨有,正因我們人類有智慧(或智能),利用雙手創造工具,並以工具輔助各種日常事務,從而有人說萬物之靈、統治地球之類讚頌詞語。
但是由觀察其他生物如何去討生活,我們會發現如蜜蜂,工蜂每天在早上離開蜂巢尋找蜜源,找到後便回到蜂巢以跳舞的方式告知其他工蜂蜜源的方向及距離,然後大批工蜂前往採蜜。除了出外採蜜的工蜂,蜂巢內的工蜂也沒閒著,除了照顧女王蜂外,還要餵食幼蟲直到化蛹。若是突然有外來者入侵蜂巢,大批工蜂便會群起攻擊。
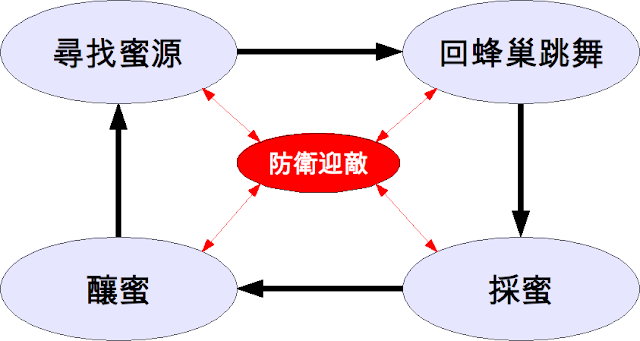
我們可以說工蜂每天都處於不同的狀態,譬如出外採蜜的工蜂,尋找蜜源、找到後回蜂巢跳舞,接著出外採蜜分別屬於三種狀態,工蜂的行為往往就是完成一個狀態的工作後,從原先的狀態轉換到另一種狀態。採蜜工作完成後就是釀蜜,這是屬於第四種狀態。我們將這四種狀態的輪替用下圖表示。

偶有突發狀態則是外來者入侵,蜜蜂為了防衛而進行攻擊,所以「防衛迎敵」是個特別的狀態,只要發生就會主動在這四個主要狀態間切換。工蜂每天週而復始的在尋找蜜源、找到蜜源後回蜂巢跳舞、工蜂往蜜源處採蜜、採蜜完成回蜂巢釀蜜,這四個狀態間循環。
許多生物的行為都能以各種狀態分別來解析,因為某些條件的改變,所以從原先的狀態轉換到另一種狀態。我們規劃遊戲角色的時候亦同,除了賦予特定角色專屬的能力與責任,使其依能力盡到他的責任,而且該角色也會在不同狀態間切換。例如即時戰略遊戲中士兵會進行探索,該士兵發現敵人後便進行攻擊,探索、攻擊便分屬兩個不同的狀態。
那如果我們要用程式模擬具有狀態轉換的行為,應該要怎麼設計呢?
回顧鬥獸棋
乒乓球遊戲我們全以函數發展,這是因為我們事前由模擬球的移動,然後一步一步的將遊戲所需的各個元件加入,由於各個元件的需求都很清楚,所以在構築整個遊戲的時候,除了使用Pygame內建的物件以外,大都是以函數來發展。
發展程式的方法哪一種好呢?函數還是自訂新的物件型態?我們建議依需求而定,函數通常單純的做一些事情,物件可以帶有更多的附加屬性,其內定義的方法則提供做事情的能力。新物件可以讓我們跳脫Pygame模組庫的層次,反倒是以遊戲本身的概念進行規劃,從而可以簡化程式的開發過程。
這就跟第四章開始發展的鬥獸棋遊戲一樣,我們自己定義新的型態(新的物件)後,便能將許多資訊封裝、隱藏到型態內,需要用到時再以小數點記號的方式存取或利用。接下來,我們把這個遊戲轉換到Pygame視窗上,同時也讓遊戲多一點趣味。
鬥獸棋的生存遊戲原本在4×4棋盤上,現在我們將四隻動物分別用圖片代替,然後移到800×600的視窗上,並讓每隻動物「探索」整個區域,某隻動物若發現獵物,就會進行「捕捉」。因此,各個角色都會在「探索」與「捕捉」兩種狀態間切換,如下圖。

每一隻動物在遊戲開始的時候都處於「探索」狀態,會依兩種情況而改變狀態,發現獵物後直接轉換為「捕捉」狀態,若是被吃則停止遊戲中的活動,這時圖示可改為灰階,或是不再顯示該圖片,藉以表示該動物已經被吃掉。
「捕捉」狀態下,若是吃到獵物,狀態就會切換回「探索」,每隻動物在遊戲中就會不斷在「探索」與「捕捉」兩種狀態間進行,直到只剩下最後一隻動物為止。
我們會以自訂型態的方式定義狀態,然後以狀態機器處理狀態的改變。當然,每一隻動物都也都屬於各自的型態,但由於基本的性質相同,所以我們會先定義一個Animal型態,囊括所有共通的屬性。
這將會有表示象、虎、貓、鼠四個物件,除此之外,四隻動物所在的世界,也就是包括背景圖的整個區域,我們同樣以定義物件(新的型態)的方式來統籌處理,使各個物件負擔各自的工作,實際Pygame圖形處理的資訊則被隱藏到新物件的定義之中。
建立World
我們定義World型態處理遊戲的世界,先以一個簡單的例子說明整體的運作模式,程式碼如下。
#《電腦做什麼事》的範例程式碼 http://pydoing.blogspot.com/

import pygame
from pygame.locals import *

from sys import exit

from gameobjects.vector2 import Vector2

screen_size = (800, 600)
title = "World Type Test"
background_image_file = "background.png"
elephant_image_file = "ge.png"
tiger_image_file = "gt.png"
cat_image_file = "gc.png"
mouse_image_file = "gm.png"

class World(object):
    def __init__(self):
        self.background = pygame.image.load(background_image_file).convert()

        elephant_image = pygame.image.load(elephant_image_file).convert_alpha()
        tiger_image = pygame.image.load(tiger_image_file).convert_alpha()
        cat_image = pygame.image.load(cat_image_file).convert_alpha()
        mouse_image = pygame.image.load(mouse_image_file).convert_alpha()

        w, h = screen_size
        elephant_data = [elephant_image, Vector2(0, 0)]
        tiger_data = [tiger_image, Vector2(0, h-tiger_image.get_height())]
        cat_data = [cat_image, Vector2(w-cat_image.get_width(), 0)]
        mouse_data = [mouse_image, Vector2(w-mouse_image.get_width(), h-mouse_image.get_height())]

        self.species = {"elephant":elephant_data, "tiger":tiger_data, "cat":cat_data, "mouse":mouse_data}

    def render(self, screen):
        screen.blit(self.background, (0, 0))
        for being in self.species.values():
        screen.blit(being[0], being[1])

def run():
    pygame.init()

    screen = pygame.display.set_mode(screen_size, 0, 32)
    pygame.display.set_caption(title)

    world = World()

    while True:
        for event in pygame.event.get():
            if event.type == QUIT:
                exit()

        world.render(screen)
        pygame.display.update()

if __name__ == "__main__":
    run()
World型態裡頭定義了兩個屬性,background就是背景圖的部份,而species用來儲存四隻動物的資料,由於我們要在800×600視窗的四個角落個別放置象、虎、貓、鼠,因此變數elephant_data、tiger_data、cat_data與mouse_data包含圖形轉換後的Surface物件,以及計算個別的座標值。
我們處理座標用了Google Code中gameobjects專案釋出的Vector2型態,這是為了稍後計算座標的兩點距離….等等之用,此專案以New BSD License授權。
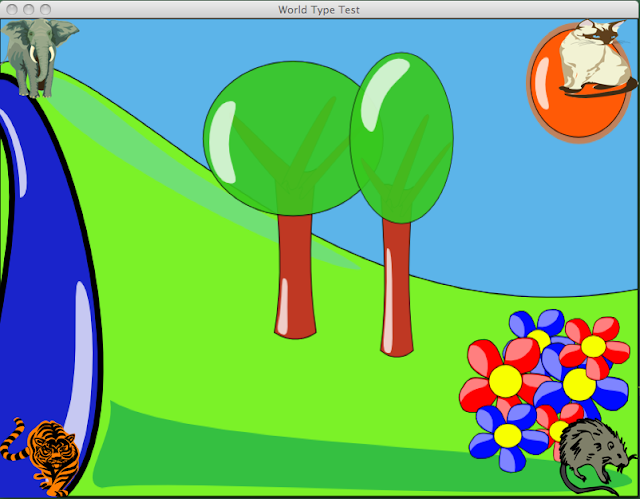
另外在World型態中定義了render()方法,用來進行個別圖檔輸出到視窗中的動作。因為這個例子的目的在於把四隻動物放到視窗中,所以,run()函數裡先建立World()型態的變數world,然後主要遊戲迴圈只是簡單的呼叫render()方法,結果如下圖。

第一篇中的鬥獸棋遊戲的主要進行模式寫在handle()函數之中,這裡,我們利用自行定義的World物件來涵蓋處理遊戲世界的一切,因此,render()方法處理Pygame的繪圖工作,我們稍後會另外定義process()方法囊括遊戲的進行模式。
建立Animal
前面的例子說明World物件的用處,接下來我們要替四隻動物規劃共通的特性,也就是定義Animal型態,如下。
#《電腦做什麼事》的範例程式碼
#http://pydoing.blogspot.com/

class Animal(object):
    def __init__(self, name, image, pos):
        self.alive = True
        self.name = name
        self.image = image
        self.location = pos
        self.speed = 100.

        def render(self, screen):
        screen.blit(self.image, self.location)
屬性alive表示存活情況,若是被吃掉以後則會轉為False,name為名稱,分別會以象、虎、貓、鼠的英文“elephant”、“tiger”、“cat”、“mouse”表示,image為載入的圖檔,location是圖檔在視窗的位置座標,speed則是圖檔移動的速度,雖然這裡還不會用到,但是我們先做定義。
Animal型態也有render()方法,主要的原因為圖檔及圖檔的位置座標都為其屬性,因而render()方法需要在Animal型態內定義。
我們還需要定義繼承自Animal型態的Elephant、Tiger、Cat、Mouse四種型態,作為表示象、虎、貓、鼠等動物之用。
#《電腦做什麼事》的範例程式碼
#http://pydoing.blogspot.com/

class Elephant(Animal):
    def __init__(self, image, pos):
        Animal.__init__(self, "elephant", image, pos)
        self.food = ["tiger", "cat"]

class Tiger(Animal):
    def __init__(self, image, pos):
        Animal.__init__(self, "tiger", image, pos)
        self.food = ["cat", "mouse"]

class Cat(Animal):
    def __init__(self, image, pos):
        Animal.__init__(self, "cat", image, pos)
        self.food = ["mouse"]

class Mouse(Animal):
    def __init__(self, image, pos):
        Animal.__init__(self, "mouse", image, pos)
        self.food = ["elephant"]
除了名稱作為預設的參數外,另外增加了屬性food,其儲存該隻動物可以吃的其他動物。
我們這裡將四隻動物改由Elephant、Tiger、Cat、Mouse等物件來建立,因此World型態的初始化方法也要有所改變,如下。
#《電腦做什麼事》的範例程式碼
#http://pydoing.blogspot.com/

class World(object):
    def __init__(self, image):
        self.background = image
        self.species = {}

    def add_being(self, being):
        self.species[being.name] = being

    def render(self, screen):
        screen.blit(self.background, (0, 0))
        for being in self.species.values():
            being.render(screen)
屬性background與Animal型態的屬性image相同,直接以轉換完的Surface物件作為參數,species改為空的字典,所以多定義了add_being(),用以增加新的動物,也就是Elephant、Tiger、Cat、Mouse等物件。
新版World型態的render()方法與之前稍有不同,這裡是呼叫species中每個物件,然後執行各自的render()方法。
由於圖檔的Surface物件都被當成參數,所以轉換圖檔的工作要在主要遊戲迴圈開始之前,所有的程式碼如下。
#《電腦做什麼事》的範例程式碼 http://pydoing.blogspot.com/

import pygame
from pygame.locals import *

from sys import exit

from gameobjects.vector2 import Vector2

screen_size = (800, 600)
title = "Aminal Type Test"
background_image_file = "background.png"
elephant_image_file = "ge.png"
tiger_image_file = "gt.png"
cat_image_file = "gc.png"
mouse_image_file = "gm.png"

class World(object):
    def __init__(self, image):
        self.background = image
        self.species = {}

    def add_being(self, being):
        self.species[being.name] = being

    def render(self, screen):
        screen.blit(self.background, (0, 0))
        for being in self.species.values():
            being.render(screen)

class Animal(object):
    def __init__(self, name, image, pos):
        self.alive = True
        self.name = name
        self.image = image
        self.location = pos

    def render(self, screen):
        screen.blit(self.image, self.location)

class Elephant(Animal):
    def __init__(self, image, pos):
        Animal.__init__(self, "elephant", image, pos)
        self.food = ["tiger", "cat"]

class Tiger(Animal):
    def __init__(self, image, pos):
        Animal.__init__(self, "tiger", image, pos)
        self.food = ["cat", "mouse"]

class Cat(Animal):
    def __init__(self, image, pos):
        Animal.__init__(self, "cat", image, pos)
        self.food = ["mouse"]

class Mouse(Animal):
    def __init__(self, image, pos):
        Animal.__init__(self, "mouse", image, pos)
        self.food = ["elephant"]

def run():
    pygame.init()

    screen = pygame.display.set_mode(screen_size, 0, 32)
    pygame.display.set_caption(title)

    background_image = pygame.image.load(background_image_file).convert()
    elephant_image = pygame.image.load(elephant_image_file).convert_alpha()
    tiger_image = pygame.image.load(tiger_image_file).convert_alpha()
    cat_image = pygame.image.load(cat_image_file).convert_alpha()
    mouse_image = pygame.image.load(mouse_image_file).convert_alpha()

    w, h = screen_size
    world = World(background_image)
    world.add_being(Elephant(elephant_image, Vector2(0, 0)))
    world.add_being(Tiger(tiger_image, Vector2(0, h-tiger_image.get_height())))
    world.add_being(Cat(cat_image, Vector2(w-cat_image.get_width(), 0)))
    world.add_being(Mouse(mouse_image, Vector2(w-mouse_image.get_width(), h-mouse_image.get_height())))

    while True:
        for event in pygame.event.get():
            if event.type == QUIT:
                exit()

        world.render(screen)
        pygame.display.update()

if __name__ == "__main__":
    run()
新程式的執行結果會與稍早相同,接下來,我們開始思考如何讓每隻動物進行探索。
探索:隨機的在視窗中移動
我們的每隻動物在Pygame視窗中分別都是一張圖檔,若是要讓每隻動物進行探索的工作,實際上也就是讓該張代表動物的圖檔隨機的在視窗中移動。這該怎麼寫出程式呢?我們設想在Animal型態中增加一個behave()方法,用來表現出該隻動物的行為。
因為探索的行為具有隨機性,我們先寫一個在Animal型態中決定隨機移動方向的方法。
#《電腦做什麼事》的範例程式碼
#http://pydoing.blogspot.com/

def random_destination(self):
    w, h = screen_size
    if randint(1, 20) == 1:
        self.destination = Vector2(randint(1, w-1), randint(1, h-1))
我們增加了一個destination屬性,其作為目的地的位置座標,所以random_destination()方法有二十分之一的機率,可以隨機的指派視窗中的座標值給屬性destination,也就是x座標介於1到799,y座標介於1到599之間的位置。
因為用了randint()函數,所以在前面引入模組的地方要加上
#《電腦做什麼事》的範例程式碼
#http://pydoing.blogspot.com/

from random import randint
behave()方法的定義中要先呼叫random_destination()方法。
#《電腦做什麼事》的範例程式碼
#http://pydoing.blogspot.com/

def behave(self, time):
    self.random_destination()

    if self.speed > 0.0 and self.location != self.destination:
        destination_vector = self.destination - self.location
        destination_distance = destination_vector.get_length()
        heading = destination_vector.get_normalized()
        travel_distance = min(destination_distance, time * self.speed)
        self.location += travel_distance * heading
behave()方法需要一個time參數,這是用為控制每一次視窗的重新繪圖所經過的時間。呼叫random_destination()方法後,接著做一個條件判斷,假設速度大於0,並且必須是目的座標與所在的位置座標不相等,然後做一些數學計算,將動物圖檔移動的距離算出來,儲存到變數travel_distance之中,再將這個距離與location屬性相加。
那我們要在哪裡呼叫behave()方法呢?雖然可以直接寫在World型態的render()方法之內,但是這樣有點不完全符合render()方法的用途,所以我們要在World型態中另外定義process()方法,其內呼叫Animal物件的behave()方法,如下。
#《電腦做什麼事》的範例程式碼
#http://pydoing.blogspot.com/

def process(self, time):
    for being in self.species.values():
        being.behave(time)
別忘了進入主要遊戲迴圈之前要先建立控制時間的clock變數,我們將到目前為止的程式碼摘錄如下。
#《電腦做什麼事》的範例程式碼
#http://pydoing.blogspot.com/

import pygame
from pygame.locals import *

from sys import exit
from random import randint

from gameobjects.vector2 import Vector2

screen_size = (800, 600)
title = "Process Method Test"
background_image_file = "background.png"
elephant_image_file = "ge.png"
tiger_image_file = "gt.png"
cat_image_file = "gc.png"
mouse_image_file = "gm.png"

class World(object):
    def __init__(self, image):
        self.background = image
        self.species = {}

    def add_being(self, being):
        self.species[being.name] = being

    def render(self, screen):
        screen.blit(self.background, (0, 0))
        for being in self.species.values():
            being.render(screen)

    def process(self, time):
        for being in self.species.values():
        being.behave(time)

class Animal(object):
    def __init__(self, name, image, pos):
        self.alive = True
        self.name = name
        self.image = image

        self.location = pos

        w, h = screen_size
        self.destination = Vector2(randint(1, w), randint(1, h))
        self.speed = 100.0

    def render(self, screen):
        screen.blit(self.image, self.location)

    def random_destination(self):
        w, h = screen_size
        if randint(1, 20) == 1:
            self.destination = Vector2(randint(1, w), randint(1, h))

    def behave(self, time):
        self.random_destination()

        if self.speed > 0.0 and self.location != self.destination:
            destination_vector = self.destination - self.location
            destination_distance = destination_vector.get_length()
            heading = destination_vector.get_normalized()
            travel_distance = min(destination_distance, time * self.speed)
            self.location += travel_distance * heading

class Elephant(Animal):
    def __init__(self, image, pos):
        Animal.__init__(self, "elephant", image, pos)
        self.food = ["tiger", "cat"]

class Tiger(Animal):
    def __init__(self, image, pos):
        Animal.__init__(self, "tiger", image, pos)
        self.food = ["cat", "mouse"]

class Cat(Animal):
    def __init__(self, image, pos):
        Animal.__init__(self, "cat", image, pos)
        self.food = ["mouse"]

class Mouse(Animal):
    def __init__(self, image, pos):
        Animal.__init__(self, "mouse", image, pos)
        self.food = ["elephant"]

def run():
    pygame.init()

    screen = pygame.display.set_mode(screen_size, 0, 32)
    pygame.display.set_caption(title)

    background_image = pygame.image.load(background_image_file).convert()
    elephant_image = pygame.image.load(elephant_image_file).convert_alpha()
    tiger_image = pygame.image.load(tiger_image_file).convert_alpha()
    cat_image = pygame.image.load(cat_image_file).convert_alpha()
    mouse_image = pygame.image.load(mouse_image_file).convert_alpha()

    w, h = screen_size
    world = World(background_image)
    world.add_being(Elephant(elephant_image, Vector2(0, 0)))
    world.add_being(Tiger(tiger_image, Vector2(0, h-tiger_image.get_height())))
    world.add_being(Cat(cat_image, Vector2(w-cat_image.get_width(), 0)))
    world.add_being(Mouse(mouse_image, Vector2(w-mouse_image.get_width(), h-mouse_image.get_height())))

    clock = pygame.time.Clock()

    while True:
        for event in pygame.event.get():
            if event.type == QUIT:
                exit()

        seconds = clock.tick(30) / 1000.0

        world.process(seconds)
        world.render(screen)
        pygame.display.update()

if __name__ == "__main__":
    run()
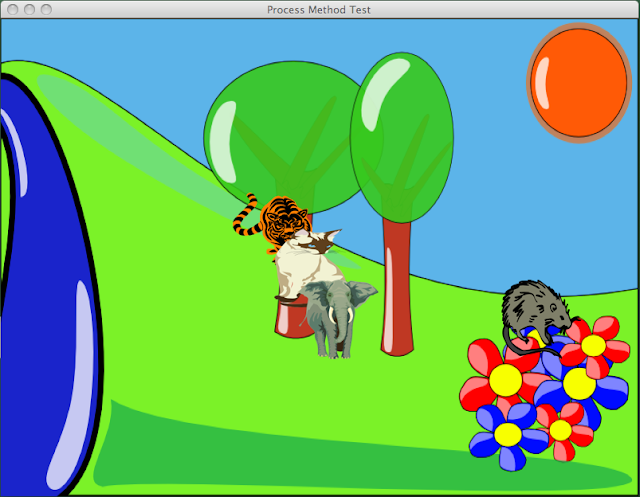
執行結果如下圖。

建立Exploring
上一節中,我們將動物的行為(隨機的在視窗中移動)寫在Animal型態的behave()方法裡,這一節我們將之改以狀態及狀態機器的設計方式。
首先,我們以State型態,將各種狀態共通的方法、屬性先行定義。
#《電腦做什麼事》的範例程式碼
#http://pydoing.blogspot.com/

class State(object):
    def __init__(self, name):
        self.name = name

    def do_actions(self):
        pass
屬性name為狀態的名稱,方法do_actions()則在此狀態下的行為,底下的pass陳述表示在這裡不做任何事情,我們寫出來的意義是說明State及繼承自State的型態會有方法do_actions(),至於實際do_actions()的內容,稍後定義繼承State的新型態再做定義。
接下來我們定義作為探索的Exploring型態。
#《電腦做什麼事》的範例程式碼
#http://pydoing.blogspot.com/

class Exploring(State):
    def __init__(self, being):
        State.__init__(self, "exploring")
        self.being = being

    def random_destination(self):
        w, h = screen_size
        if randint(1, 20) == 1:
            self.being.destination = Vector2(randint(1, w-1), randint(1, h-1))

    def do_actions(self, time):
        self.random_destination()

        if self.being.speed > 0.0 and self.being.location != self.being.destination:
            destination_vector = self.being.destination - self.being.location
            destination_distance = destination_vector.get_length()
            heading = destination_vector.get_normalized()
            travel_distance = min(destination_distance, time * self.being.speed)
            self.being.location += travel_distance * heading
繼承自State型態,同時需要多一個參數,這個參數為動物的物件型態。為什麼要有一個動物的物件型態做參數呢?這是因為我們要將之前定義在Animal型態中的random_destination()及behave()方法移過來,後者的內容放到do_actions()方法之內,由於座標是屬於動物的物件屬性,所以在Exploring型態需要用動物的物件型態做參數。
於是原本behave()方法中的speed、location等屬性,到了do_actions()方法中都要改為being.speed、being.location等,這使Elephant、Tiger、Cat、Mouse等物件中的座標屬性值跟著程式進行而改變。
另外,我們需要一個狀態機器來管理所有的狀態,這需要定義的是StateMachine型態。
#《電腦做什麼事》的範例程式碼
#http://pydoing.blogspot.com/

class StateMachine(object):
    def __init__(self):
        self.states = {}
        self.active_state = None

    def add_state(self, state):
        self.states[state.name]= state

    def think(self, time):
        if self.active_state is None:
            return

        self.active_state.do_actions(time)

    def set_state(self, new_state_name):
        self.active_state = self.states[new_state_name]
所有的狀態用屬性states來儲存,而目前的狀態則是以active_state來表示,add_state()方法替狀態機器(StateMachine型態)加入新的狀態,set_state()方法則設定目前的狀態,think()方法使物件判斷該做什麼事情,包括程式進行時控制狀態的改變,由於目前只有一種狀態,所以think()就只有簡單的呼叫do_actions()方法。
我們還要替原先的Animal型態增加一個屬性brain。
#《電腦做什麼事》的範例程式碼
#http://pydoing.blogspot.com/

self.brain = StateMachine()
然後其內原先behave()方法則改為呼叫think()方法。
#《電腦做什麼事》的範例程式碼
#http://pydoing.blogspot.com/

def behave(self, time):
    self.brain.think(time)
如此我們有了一個狀態,讓動物隨機的探索視窗區域,同時可以繼續延伸讓狀態改變,從而讓動物表現不同的行為,到目前為所有的程式如下。
#《電腦做什麼事》的範例程式碼 http://pydoing.blogspot.com/

import pygame
from pygame.locals import *

from sys import exit
from random import randint

from gameobjects.vector2 import Vector2

screen_size = (800, 600)
title = "State Type Test"
background_image_file = "background.png"
elephant_image_file = "ge.png"
tiger_image_file = "gt.png"
cat_image_file = "gc.png"
mouse_image_file = "gm.png"

class State(object):
    def __init__(self, name):
        self.name = name

    def do_actions(self):
        pass

class Exploring(State):
    def __init__(self, being):
        State.__init__(self, "exploring")

        self.being = being

    def random_destination(self):
        w, h = screen_size
        if randint(1, 20) == 1:
            self.being.destination = Vector2(randint(1, w-1), randint(1, h-1))

    def do_actions(self, time):
        self.random_destination()

        if self.being.speed > 0.0 and self.being.location !=self.being.destination:
            destination_vector = self.being.destination - self.being.location
            destination_distance = destination_vector.get_length()
            heading = destination_vector.get_normalized()
            travel_distance = min(destination_distance, time * self.being.speed)
            self.being.location += travel_distance * heading

class StateMachine(object):
    def __init__(self):
        self.states = {}
        self.active_state = None

    def add_state(self, state):
        self.states[state.name]= state

    def think(self, time):
        if self.active_state is None:
            return

        self.active_state.do_actions(time)

    def set_state(self, new_state_name):
        self.active_state = self.states[new_state_name]

class World(object):
    def __init__(self, image):
        self.background = image
        self.species = {}

    def add_being(self, being):
        self.species[being.name] = being

    def render(self, screen):
        screen.blit(self.background, (0, 0))
        for being in self.species.values():
            being.render(screen)

    def process(self, time):
        for being in self.species.values():
            being.behave(time)

class Animal(object):
    def __init__(self, name, image, pos):
        self.alive = True
        self.name = name
        self.image = image

        self.location = pos

        w, h = screen_size
        self.destination = Vector2(randint(1, w), randint(1, h))
        self.speed = 100.0

        self.brain = StateMachine()

        def render(self, screen):
        screen.blit(self.image, self.location)

    def behave(self, time):
        self.brain.think(time)

class Elephant(Animal):
    def __init__(self, image, pos):
        Animal.__init__(self, "elephant", image, pos)
        self.food = ["tiger", "cat"]

        self.brain.add_state(Exploring(self))

class Tiger(Animal):
    def __init__(self, image, pos):
        Animal.__init__(self, "tiger", image, pos)
        self.food = ["cat", "mouse"]

        self.brain.add_state(Exploring(self))

class Cat(Animal):
    def __init__(self, image, pos):
        Animal.__init__(self, "cat", image, pos)
        self.food = ["mouse"]

        self.brain.add_state(Exploring(self))

class Mouse(Animal):
    def __init__(self, image, pos):
        Animal.__init__(self, "mouse", image, pos)
        self.food = ["elephant"]

        self.brain.add_state(Exploring(self))

def run():
    pygame.init()

    screen = pygame.display.set_mode(screen_size, 0, 32)
    pygame.display.set_caption(title)

    background_image = pygame.image.load(background_image_file).convert()
    elephant_image = pygame.image.load(elephant_image_file).convert_alpha()
    tiger_image = pygame.image.load(tiger_image_file).convert_alpha()
    cat_image = pygame.image.load(cat_image_file).convert_alpha()
    mouse_image = pygame.image.load(mouse_image_file).convert_alpha()

    world = World(background_image)

    w, h = screen_size
    elephant = Elephant(elephant_image, Vector2(0, 0))
    elephant.brain.set_state("exploring")
    world.add_being(elephant)

    tiger = Tiger(tiger_image, Vector2(0, h-tiger_image.get_height()))
    tiger.brain.set_state("exploring")
    world.add_being(tiger)

    cat = Cat(cat_image, Vector2(w-cat_image.get_width(), 0))
    cat.brain.set_state("exploring")
    world.add_being(cat)

    mouse = Mouse(mouse_image, Vector2(w-mouse_image.get_width(), h-mouse_image.get_height()))
    mouse.brain.set_state("exploring")
    world.add_being(mouse)

    clock = pygame.time.Clock()

    while True:
        for event in pygame.event.get():
            if event.type == QUIT:
                exit()

        seconds = clock.tick(30) / 1000.0

        world.process(seconds)
        world.render(screen)
        pygame.display.update()

if __name__ == "__main__":
    run()
結果會與上一節相同。
重提State
我們若是繼續發展,State型態也需要適當的擴充,如下。
#《電腦做什麼事》的範例程式碼
#http://pydoing.blogspot.com/

class State(object):
    def __init__(self, name):
        self.name = name

    def entry_actions(self):
        pass

    def do_actions(self):
        pass

    def exit_actions(self):
        pass

    def check_conditions(self):
        pass
進入某一狀態就呼叫entry_actions()方法,離開狀態呼叫exit_actions()方法,在該狀態裡面則是執行do_actions()方法,另外利用check_conditions()方法進行狀態的改變的檢查。
所以StateMachine型態的think()方法要更改如下。
#《電腦做什麼事》的範例程式碼
#http://pydoing.blogspot.com/

def think(self, time):
    if self.active_state is None:
        return

    self.active_state.do_actions()

    new_state_name = self.active_state.check_conditions()
    if new_state_name is not None:
        self.set_state(new_state_name)
主要是增加了狀態的條件檢查,也就是呼叫check_conditions()方法,若是條件符合另一種狀態時,譬如「貓」走近到「虎」的附近,我們使「虎」感知到「貓」的靠近,於是「虎」的狀態由「探索」轉變為「捕捉」,「貓」的所在座標就變成「虎」的目的座標,形成「捕捉」的行為。
這時候set_state()方法也要稍微修改。
#《電腦做什麼事》的範例程式碼
#http://pydoing.blogspot.com/

def set_state(self, new_state_name):
    if self.active_state is not None:
        self.active_state.exit_actions()

    self.active_state = self.states[new_state_name]
    self.active_state.entry_actions()
狀態改變前先呼叫exit_actions()方法,如「虎」大叫一聲,然後設定成新的捕捉狀態,接著呼叫entry_actions()方法,這時如「虎」加快速度,往「貓」跑去的動作就是呼叫捕捉狀態的do_actions()方法。
我們遊戲的人工智慧大致發展到這裡,同時也說明了以物件為主的程式發展。
下一步
Pygame模組庫除了圖形顯示外,還有許多其他的功能,如Mixer可以載入與處理音效,Joystick可以設定遊戲控制桿等……,我們的介紹以程式設計的概念與發展為主軸,因此還有許多Pygame精彩的地方只好略去不提了。
若是對Pygame想要深入研究,官網上的Tutorials頁提供了其他的教材,另外官網所建議的Beginning Game Development with Python and Pygame: From Novice to Professional也是一本絕佳的參考書籍。
下一章,我們開始介紹另一個圖形介面的模組庫 --- wxPython,來看看如何利用Python發展應用程式介面。