#《電腦做什麼事》的範例程式碼
#http://pydoing.blogspot.com/

import pygame
from pygame.locals import *
from sys import exit

screen_size = (800, 600)
title = "Hello, Real world!"
background_image = "background.png"
cursor_image = "cursor.png"

def mouse_pos(img):
    x, y = pygame.mouse.get_pos()
    x -= img.get_width() / 2
    y -= img.get_height() / 2
    return x, y

def run():
    pygame.init()

    screen = pygame.display.set_mode(screen_size, 0, 32)
    pygame.display.set_caption(title)

    background = pygame.image.load(background_image).convert()
    cursor = pygame.image.load(cursor_image).convert_alpha()

    while True:
        for event in pygame.event.get():
            if event.type == QUIT:
                exit()

        screen.blit(background, (0, 0))
        screen.blit(cursor, mouse_pos(cursor))

        pygame.display.update()

if __name__ == "__main__":
    run()
執行這個程式,我們會得到如下的結果。

背景圖的處理透過變數background,以image模組中的load()函數來載入圖像檔案,需要一個檔名的參數,型態為字串,然後建立一個Surface型態的物件,這裡直接套用Surface型態的convert()方法,再點陣圖的格式傳換為顯示於螢幕的相容格式,主要是為了加快Python的處理速度。
滑鼠游標的圖形則是透過變數cursor進行處理,同樣以image模組中的load()函數載入圖像檔案,然而這個圖檔包括透明的影像格式,因此是用Surface型態的convert_alpha()方法轉換。
進入到遊戲主要迴圈,仍需透過Surface物件的blit()方法將兩個圖像轉換到screen,同時須指定圖像的左上角的起始座標,由於滑鼠游標的位置並沒有固定,這裡我們利用mouse_pos()函數處理滑鼠座標。
在mouse_pos()函數的定義內,第一行:
#《電腦做什麼事》的範例程式碼
#http://pydoing.blogspot.com/

x, y = pygame.mouse.get_pos()
這是利用mouse模組的get_pos()函數取得目前滑鼠游標的座標位置。以下兩行計算x、y值的程式碼:
#《電腦做什麼事》的範例程式碼
#http://pydoing.blogspot.com/

x -= cursor.get_width() / 2
y -= cursor.get_height() / 2
這是要將滑鼠游標放置於圖形中央,不然滑鼠游標會出現在圖像的左上角。最後的return陳述將xy座標回傳給blit()方法。
第二篇所用的圖像檔案全部取自開放的向量美工圖庫----Open Clip Art Library。
昆蟲世界
接下來我們繼續為Real world繼續增加一些昆蟲,也就是在Pygame視窗中顯示新的圖像檔案,程式碼如下。
#《電腦做什麼事》的範例程式碼 http://pydoing.blogspot.com/

import pygame
from pygame.locals import *
from sys import exit

screen_size = (800, 600)
title = "Hello, Real world!"
background_image = "background.png"
cursor_image = "cursor.png"
butterfly_image = "butterfly.png"
grasshopper_image = "grasshopper.png"
mantis_image = "mantis.png"
ant_image = "ant.png"
bee_image = "bee.png"

def mouse_pos(img):
    x, y = pygame.mouse.get_pos()
    x -= img.get_width() / 2
    y -= img.get_height() / 2
    return x, y

def mantis_pos(img):
    x = screen_size[0] - img.get_width()
    y = screen_size[1] - img.get_height()
    return x, y

def butterfly_pos(x, y, dx, dy):
    if 0 <= x <= 800:
        x += dx
    else:
        x = 0

    if 150 <= y <= 300:
        y += dy
    elif y < 150:
        dy *= -1
        y = 150
    elif y > 300:
        dy *= -1
        y = 300

    return x, y, dx, dy

def run():
    pygame.init()

    screen = pygame.display.set_mode(screen_size, 0, 32)
    pygame.display.set_caption(title)

    background = pygame.image.load(background_image).convert()
    cursor = pygame.image.load(cursor_image).convert_alpha()
    butterfly = pygame.image.load(butterfly_image).convert_alpha()
    grasshopper = pygame.image.load(grasshopper_image).convert_alpha()
    mantis = pygame.image.load(mantis_image).convert_alpha()
    ant = pygame.image.load(ant_image).convert_alpha()
    bee = pygame.image.load(bee_image).convert_alpha()

    ipx, ipy = 1, 200
    dx, dy = 1, 1

    i = 1
    while True:
        for event in pygame.event.get():
            if event.type == QUIT:
                exit()

        screen.blit(background, (0, 0))
        screen.blit(cursor, mouse_pos(cursor))
        screen.blit(butterfly, (ipx, ipy))

        ipx, ipy, dx, dy = butterfly_pos(ipx, ipy, dx, dy)

        screen.blit(grasshopper, (170, 520))
        screen.blit(mantis, mantis_pos(mantis))
        screen.blit(ant, (490, 470))
        screen.blit(bee, (630, 293))

        i += 1
        pygame.display.update()

if __name__ == "__main__":
    run()
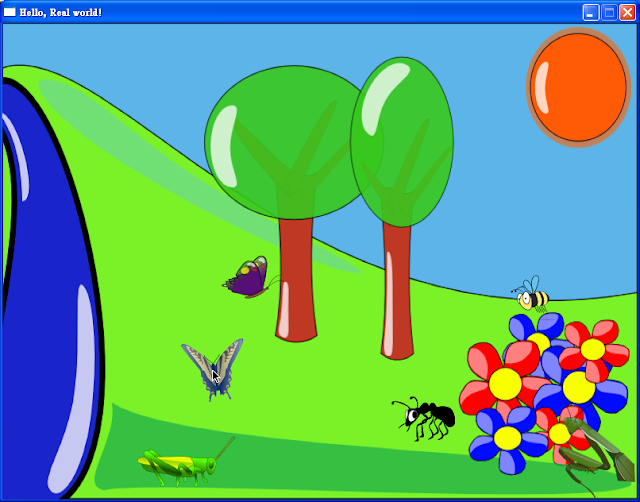
執行程式,我們會得到類似下面的結果。

新的程式中,我們增加了五個圖像檔案以及兩個函數定義,其中蜜蜂、螞蟻、蝗蟲直接在blit()方法中指定座標,螳螂及另一隻蝴蝶我們則是利用函數取得座標值。雖然螳螂固定出現在視窗的右下角,但是我們用mantis_pos()函數計算座標,這是因為螳螂的位置可以利用變數screen_size及get_width()與get_height()兩個方法計算出來,如果我們改變screen_size的值,螳螂的顯示不會受到影響。
比較特別的是一隻蝴蝶不斷的從視窗左邊往右邊移動,好像在y座標150到300間朝下或朝上飛舞一般。我們在遊戲主要迴圈開始之前先設定起始座標,ipx及ipy,以及座標改變量,dx及dy。然後進入遊戲主要迴圈,每一次繪圖,也就是利用blit()方法輸出圖像之後,重新利用butterfly_pos()函數得到新的座標值與改變量。
迴圈持續進行,蝴蝶向右移動時x座標始終遞增1,到視窗邊緣,也就是x等於800時,將x重新指派為0,於是蝴蝶又重新回到左邊回復向右。蝴蝶往上y座標遞減1,到y座標等於150的時候,dy正負號改變,蝴蝶變為往下,y座標遞增1,到y座標等於300的時候,dy正負號再度改變,蝴蝶轉而往上。
這與上一章所提動畫效果的例子概念相同,我們要在Pygame視窗中讓Surface物件移動,就要適當的在遊戲主要迴圈中改變xy座標值,然後隨著Pygame視窗每一次重新繪圖,讓Surface物件出現在不同的位置。
難不難呢?到目前為主我們看到的都是Surface物件自己移動,稍後再介紹如何利用透過滑鼠或鍵盤控制,我們先來看看如何直接利用Pygame的draw模組來畫圖。
基本的幾何形狀
draw模組中用來畫圖的函數如下表。

這裡我們以rect()、polygon()及circle()三個函數為例,讓Pygame視窗的左上方畫出圓形,右上發畫三角形,下方畫長方形,隨機顏色、位置、大小,程式碼如下。
#《電腦做什麼事》的範例程式碼 http://pydoing.blogspot.com/

import pygame
from pygame.locals import *
from sys import exit
from random import randint

screen_size = (800, 600)
title = "Draw Test"
black = (0, 0, 0)

def run():
    pygame.init()

    screen = pygame.display.set_mode(screen_size, 0, 32)
    pygame.display.set_caption(title)
    screen.fill(black)

    while True:
        for event in pygame.event.get():
            if event.type == QUIT:
                exit()

        color_circle = (randint(0, 255), randint(0, 255), randint(0, 255))
        color_triangle = (randint(0, 255), randint(0, 255), randint(0, 255))
        color_rect = (randint(0, 255), randint(0, 255), randint(0, 255))

        pos_circle = (randint(0, 400), randint(0, 400))
        pos_triangle =  [(randint(400, 800), randint(0, 400)), (randint(400, 800), randint(0, 400)), (randint(400, 800), randint(0, 400))]
        pos_rect = (randint(0, 800), randint(400, 600))

        radius = randint(0, 200)
        size_rect =  (randint(0, 600), randint(0, 100))

        pygame.draw.circle(screen, color_circle, pos_circle, radius)
        pygame.draw.polygon(screen, color_triangle, pos_triangle)
        pygame.draw.rect(screen, color_rect, Rect(pos_rect, size_rect))

        pygame.display.update()

if __name__ == "__main__":
    run()
執行結果如下。

圓心位置控制在座標(0, 0)到(400, 400)之間,半徑為0到400,三角形三點座標的範圍是在(400, 0)到(800, 400),而長方形的左上角座標則是在(0, 400)到(800, 600)的區域,橫幅小於600,縱幅小於100。三角形是用polygon()函數畫的,其中的點座標須用串列儲存,長方形包含起始座標位置與大小,這是rect()函數的第三個參數,另外呼叫一個Rect()函數來指定。
關於draw模組,詳情可參考Pygame的官方文件。
用七巧板排列
七巧板是種有趣的一種益智遊戲,以五種簡單的幾何圖形,總數七個搭配不同顏色,就可以拼組出千變萬化的形象圖案。利用Pygame的draw模組把七巧板拼成正方形,會得到如下的結果。

程式碼如下。
#《電腦做什麼事》的範例程式碼 http://pydoing.blogspot.com/

import pygame
from pygame.locals import *
from sys import exit
from random import randint

screen_size = (800, 600)
tangram_size = (400, 400)
title = "Tangram Test"
colors = {"black":(0, 0, 0), "blue":(0, 0, 255), "green":(0, 128, 0), "red":(255, 0, 0), "yellow":(255, 255, 0), "purple":(128, 0, 128), "gray":(128, 128, 128), "olive":(128, 128, 0)}
points = {1:[(325, 225), (475, 225), (400, 300)], 2:[(325, 225), (400, 300), (325, 375)], 3:[(362.5, 337.5), (400, 375), (325, 375)], 4:[(400, 300), (362.5, 337.5), (400, 375), (437.5, 337.5)], 5:[(400, 375), (475, 375), (475, 300)], 6:[(400, 300), (437.5, 262.5), (437.5, 337.5)], 7: [(437.5, 262.5), (475, 225), (475, 300), (437.5, 337.5)]}

def run():
    pygame.init()

    screen = pygame.display.set_mode(screen_size, 0, 32)
    pygame.display.set_caption(title)

    while True:
        for event in pygame.event.get():
            if event.type == QUIT:
                exit()

        screen.fill(colors["black"])

        pygame.draw.polygon(screen, colors["blue"], points[1])
        pygame.draw.polygon(screen, colors["olive"], points[2])
        pygame.draw.polygon(screen, colors["gray"], points[3])
        pygame.draw.polygon(screen, colors["purple"], points[4])
        pygame.draw.polygon(screen, colors["yellow"], points[5])
        pygame.draw.polygon(screen, colors["red"], points[6])
        pygame.draw.polygon(screen, colors["green"], points[7])

        pygame.display.update()

if __name__ == "__main__":
    run()
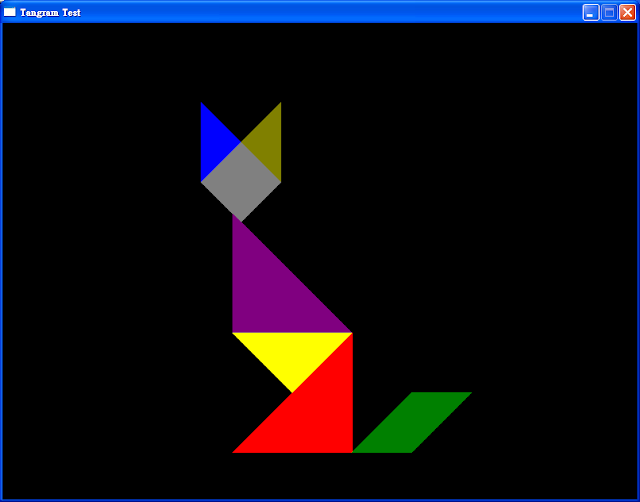
這裡我們把顏色及所有座標點都用字典型態儲存,這可避免需要建立太多的變數。重新指定七個板塊的座標,我們可以拼成其他的形狀,如下。

嗯,看起來像一隻站立的貓,不過拼一次就要重新設定座標,這似乎有點麻煩,我們來試看看如何用滑鼠來控制移動吧!
滑鼠控制移動
範例程式碼如下。
#《電腦做什麼事》的範例程式碼 http://pydoing.blogspot.com/

import pygame
from pygame.locals import *
from sys import exit

screen_size = (800, 600)
tank_size = (300, 200)
title = "Mouse Control Test"
black = (0, 0, 0)
blue = (0, 0, 255)
points = [(200, 200), (500, 200), (500, 400), (200, 400)]

moves = []

def run():
    pygame.init()

    screen = pygame.display.set_mode(screen_size, 0, 32)
    pygame.display.set_caption(title)

    while True:
        for event in pygame.event.get():
            if event.type == QUIT:
                exit()
            if event.type == MOUSEMOTION:
                moves.append(event.rel)

        screen.fill(black)

        mouse_pos = pygame.mouse.get_pos()


        pygame.draw.polygon(screen, blue, points)

        min_x = min(points[0][0], points[1][0], points[2][0], points[3][0])
        max_x = max(points[0][0], points[1][0], points[2][0], points[3][0])
        min_y = min(points[0][1], points[1][1], points[2][1], points[3][1])
        max_y = max(points[0][1], points[1][1], points[2][1], points[3][1])

        if pygame.mouse.get_pressed()[0]:
            if min_x <= mouse_pos[0] <= max_x and min_y <= mouse_pos[1] <= max_y:
                for i in range(4):
                    x = points[i][0] + moves[-1][0]
                    y = points[i][1] + moves[-1][1]
                    points[i] = (x, y)

        pygame.display.update()

if __name__ == "__main__":
    run()
首先把情況簡化,我們只用polygon()函數建立一個300×200的長方形Rect物件,需要指定四個座標點。
#《電腦做什麼事》的範例程式碼
#http://pydoing.blogspot.com/

points = [(200, 200), (500, 200), (500, 400), (200, 400)]
另外建立一個空串列記錄滑鼠的移動量。
#《電腦做什麼事》的範例程式碼
#http://pydoing.blogspot.com/

moves = []
進入遊戲的主要迴圈,在事件處理的迴圈中,如果變數event的type屬性為MOUSEMOTION,串列moves就要增加event.rel的值,rel屬性是滑鼠的移動量。
#《電腦做什麼事》的範例程式碼
#http://pydoing.blogspot.com/

if event.type == MOUSEMOTION:
    moves.append(event.rel)
接著利用mouse模組的get_pos()函數取得滑鼠游標的位置座標。
#《電腦做什麼事》的範例程式碼
#http://pydoing.blogspot.com/

mouse_pos = pygame.mouse.get_pos()
繪圖是必然的步驟。
#《電腦做什麼事》的範例程式碼
#http://pydoing.blogspot.com/

pygame.draw.polygon(screen, blue, points)
因為四個端點座標值隨滑鼠控制下的移動而改變,所以在每一次繪圖完成後,我們需要找出所有最大、最小的x及y座標,以能決定長方形物件的範圍。
#《電腦做什麼事》的範例程式碼
#http://pydoing.blogspot.com/

min_x = min(points[0][0], points[1][0], points[2][0], points[3][0])
max_x = max(points[0][0], points[1][0], points[2][0], points[3][0])
min_y = min(points[0][1], points[1][1], points[2][1], points[3][1])
max_y = max(points[0][1], points[1][1], points[2][1], points[3][1])
內建函數min()可以找出參數中的最小值,max()則可找出參數中的最大值,這裡利用min_x、min_y、max_x與max_y儲存x及y座標的最大值及最小值。然後我們希望滑鼠游標移動到長方形區域時,同時按住左鍵即可控制長方形的移動。
#《電腦做什麼事》的範例程式碼
#http://pydoing.blogspot.com/

if pygame.mouse.get_pressed()[0]:
    if min_x <= mouse_pos[0] <= max_x and min_y <= mouse_pos[1] <= max_y:
        for i in range(4):
            x = points[i][0] + moves[-1][0]
            y = points[i][1] + moves[-1][1]
            points[i] = (x, y)
mouse模組中的get_pressed()函數會回傳一個序對,包含三個布林值,0或1,如果按下滑鼠左鍵,get_pressed()[0]就會設為1,按下滑鼠中鍵是get_pressed()[1]為1,而按下滑鼠右鍵則是get_pressed()[2]為1。沒有按下滑鼠按鍵,這個序對值則是(0, 0, 0)。
當使用者按著滑鼠左鍵不放時,「if pygame.mouse.get_pressed()[0]:」的條件檢查為真,便進行下一個if條件檢查,「if min_x <= mouse_pos[0] <= max_x and min_y <= mouse_pos[1] <= max_y:」這個檢查則是判斷滑鼠游標是否落在長方形區域內,如果為真,緊接著的for迴圈就會將滑鼠移動量加進變數points之中。變數points所儲存的就是長方形的四個端點座標。
for迴圈是如何做的呢?內建函數range(4)會建立一個[0, 1, 2, 3]的串列,變數i會分別被指派0、1、2及3,共執行四次,這與串列points所儲存的四組座標(序對)符合,滑鼠位移量儲存在串列moves之中,其為一個序對,包含兩個值,分別是x方向與y方向的移動量,索引值-1得到串列的最後一個,這也得到滑鼠即時的移動量。
原先長方形端點的x座標與x方向的移動量相加,被指派到變數x之中,y座標與y方向的移動量之和責備指派到變數y之中,然後依索引值,也就是四個端點依次重新指派到串列points之中,這是因為串列是可變的資料型態,而序對是不可變的,因此我們無法直接修改串列中的序對值。
來執行看看吧!

張貼新的事件
有沒有注意到執行時發生了一件有趣的事情,控制長方形物件移動時,只要按住滑鼠左鍵,滑鼠移動後持續按住左鍵,藍色的長方形依然繼續朝原先滑鼠移動的方向前進,直到滑鼠游標抵達長方形的邊緣,長方形才停止移動。
可是大部分利用滑鼠控制的遊戲,通常滑鼠將物體移動到哪裡,物體隨之移動到哪裡,滑鼠停止移動物體也隨之停止移動,並不會有這種情形發生,這是為什麼呢?
問題在於我們的這個程式第一個條件檢查是否按下滑鼠左鍵,條件成立再檢查游標是否落在長方行區域內,條件還是成立,長方形的四個端點座標就會不斷的加入x、y位移量,因此即使我們停止滑鼠移動,但是只要仍按著滑鼠左鍵,同時滑鼠游標位於長方形區域內,長方形便會持續移動,直到兩個條件其中之一不成立為止。
我們採取一個簡單的方式改善這個問題,在for迴圈之後加入以下的一行陳述。
#《電腦做什麼事》的範例程式碼
#http://pydoing.blogspot.com/

pygame.event.post(pygame.event.wait())
利用event模組中的post()函數,我們可以張貼新的事件到處理事件的迴圈中,這裡我們所加入的是event模組中的wait()函數,會使程式等待新的事件發生。於是除非有新的事件發生,如滑鼠移動或是按下鍵盤按鍵,程式才會繼續進行,從而改善了原先程式的情況。
可移動板塊的七巧板
我們暫時不考慮版塊的旋轉問題,先把製作可受滑鼠控制移動的七巧板程式碼放到函數中。
#《電腦做什麼事》的範例程式碼
#http://pydoing.blogspot.com/

def tan(screen, pos, color, point):
    pygame.draw.polygon(screen, color, point)

    min_x, max_x = point[0][0], point[0][0]
    min_y, max_y = point[0][1], point[0][1]
    for i in point:
        if min_x > i[0]:
            min_x = i[0]
        if max_x < i[0]:
            max_x = i[0]
        if min_y > i[1]:
            min_y = i[1]
        if max_y < i[1]:
            max_y = i[1]

    if pygame.mouse.get_pressed()[0]:
        if min_x <= pos[0] <= max_x and min_y <= pos[1] <= max_y:
            for i in range(len(point)):
                x = point[i][0] + moves[-1][0]
                y = point[i][1] + moves[-1][1]
                point[i] = (x, y)
            pygame.event.post(pygame.event.wait())
我們定義一個tan()函數,用來製作每個七巧板的版塊。共需四個參數,因為繪圖的工作也放進這個函數之中,所以建立Pygame視窗的變數screen要作為參數之一,參數pos代表主要遊戲迴圈中pygame.mouse.get_pos()所抓到的滑鼠游標位置,參數color指定顏色,參數point則指定座標的串列。
函數的第一個工作便是繪圖,接下來的程式碼則是簡單的線性搜尋,找出x、y座標的最大值及最小值。
#《電腦做什麼事》的範例程式碼
#http://pydoing.blogspot.com/

min_x, max_x = point[0][0], point[0][0]
min_y, max_y = point[0][1], point[0][1]
for i in point:
    if min_x > i[0]:
        min_x = i[0]
    if max_x < i[0]:
        max_x = i[0]
    if min_y > i[1]:
        min_y = i[1]
    if max_y < i[1]:
        max_y = i[1]
這是因為point所得到的串列,長度有兩種情況,3或4,因此先將第一個元素指派到變數min_x、max_x、min_y、max_y之中,然後用for迴圈檢查串列中的每個元素,並與分別與這四個變數做比較,若是大於變數,就將該元素值重新指派到變數之中。
也由於串列point的長度可能為3或4,所以原本的range(4)改成range(len(point)),內建函數len()計算出複合資料型態的長度,也就是內含元素的的總數。
我們把所有程式碼列出如下。
#《電腦做什麼事》的範例程式碼
#http://pydoing.blogspot.com/

import pygame
from pygame.locals import *
from sys import exit

screen_size = (800, 600)
tangram_size = (400, 400)
title = "Tangram Test"

colors = {"black":(0, 0, 0), "blue":(0, 0, 255), "green":(0, 128, 0), \
"red":(255, 0, 0), "yellow":(255, 255, 0), \
"purple":(128, 0, 128), "gray":(128, 128, 128), \
"olive":(128, 128, 0)}
points = {1:[(325, 225), (475, 225), (400, 300)], \
2:[(325, 225), (400, 300), (325, 375)], \
3:[(362.5, 337.5), (400, 375), (325, 375)], \
4:[(400, 300), (362.5, 337.5), (400, 375), (437.5, 337.5)], \
5:[(400, 375), (475, 375), (475, 300)], \
6:[(400, 300), (437.5, 262.5), (437.5, 337.5)], \
7: [(437.5, 262.5), (475, 225), (475, 300), (437.5, 337.5)]}

moves = []

def tan(screen, pos, color, point):
    pygame.draw.polygon(screen, color, point)

    min_x, max_x = point[0][0], point[0][0]
    min_y, max_y = point[0][1], point[0][1]
    for i in point:
        if min_x > i[0]:
            min_x = i[0]
        if max_x < i[0]:
            max_x = i[0]
        if min_y > i[1]:
            min_y = i[1]
        if max_y < i[1]:
            max_y = i[1]

    if pygame.mouse.get_pressed()[0]:
        if min_x <= pos[0] <= max_x and min_y <= pos[1] <= max_y:
            for i in range(len(point)):
                x = point[i][0] + moves[-1][0]
                y = point[i][1] + moves[-1][1]
                point[i] = (x, y)
                pygame.event.post(pygame.event.wait())

def run():
    pygame.init()

    screen = pygame.display.set_mode(screen_size, 0, 32)
    pygame.display.set_caption(title)

    while True:
        for event in pygame.event.get():
            if event.type == QUIT:
                exit()
            if event.type == MOUSEMOTION:
                moves.append(event.rel)

        screen.fill(colors["black"])

        mouse_pos = pygame.mouse.get_pos()

        tan(screen, mouse_pos, colors["blue"], points[1])
        tan(screen, mouse_pos, colors["olive"], points[2])
        tan(screen, mouse_pos, colors["gray"], points[3])
        tan(screen, mouse_pos, colors["purple"], points[4])
        tan(screen, mouse_pos, colors["yellow"], points[5])
        tan(screen, mouse_pos, colors["red"], points[6])
        tan(screen, mouse_pos, colors["green"], points[7])

        pygame.display.update()

if __name__ == "__main__":
    run()
來玩看看吧!
